Beginner's Hands-on Guide to Dockerfile
This article is a translated version of my original post on Qiita. Original (Japanese): https://qiita.com/segur/items/0c9270e0c48805c600fb
Additional Notes as of 2025/07/01
This article was originally created in 2019 and some content may be outdated.
I have created a new version for 2025, so please take a look!
https://qiita.com/segur/items/fd5de421ded17599499b
End of notes
This article is for the second day of the Docker Advent Calendar 2019. Yesterday featured an article by @kai_kou on benchmarking AWS and GCP instances and container services using Docker container-based UnixBench.
Beginner's Hands-on Guide to Dockerfile
We've conducted a hands-on session for Docker beginners focusing on Dockerfile creation. Here I'll share the materials used during that session.
The goal is to become familiar with Docker commands and Dockerfile, so detailed explanations of Docker are omitted.
Let's proceed under the assumption that Docker is already installed on your PC.
By following the steps outlined here, you'll gain experience with Docker commands and Dockerfile!
Lightweight Linux—That's Alpine
When it comes to Linux, CentOS and Ubuntu are well-known, but in the Docker realm, using the lightweight Alpine is standard.
From here onward, we will proceed under the assumption of using Alpine.
Want an Alpine Machine Running on Windows/Mac?
Why use Docker? Because we want to use Linux on Windows or Mac!
Let's dive into experiencing Alpine running on Windows/Mac from here on.
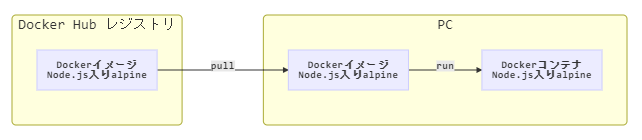
Pulling a Docker Image with Alpine
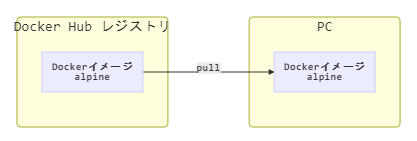
First, let's obtain a Docker image—consider it as a blueprint for a Linux machine.
Docker images are publicly available on Docker Hub, and you can download them using the following command.
# Download the Alpine Docker image
docker pull alpine:3.9
If your network is behind a proxy, you might encounter errors here! Check your Docker proxy settings.
Generating a Docker Container with Alpine
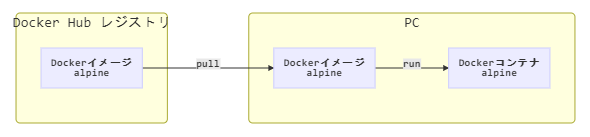
Next, generate a Docker container. Think of a Docker container as the actual Linux machine.
Generate the container and access it with the command below.
# Generate and enter a Docker container
docker run -it alpine:3.9 /bin/ash
Just like that, you can access an Alpine machine!
The docker run command is used to start containers.
The -i option allows the container to accept standard input.
The -t option assigns a pseudo-TTY. Together as -it, it allows you to input commands within the container.
Entering input into the container is referred to as entering the container in this article.
/bin/ash indicates the shell to use within the container. Since Alpine doesn't support /bin/bash, we use /bin/ash instead (this is deliberate, not a typo).
Once inside the container, use exit to leave.
# Exit the container
exit
Confirming the ID of the Created Container
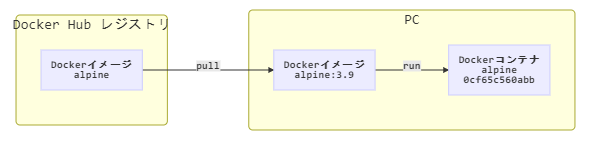
Upon exiting, the container isn't deleted but still exists.
Use the following command to check the ID!
# Check the created Docker container
docker ps -af ancestor=alpine:3.9
This will display information like below.
CONTAINER ID        IMAGE               COMMAND                  CREATED             STATUS                     PORTS               NAMES
0cf65c560abb        alpine:3.9          "/bin/ash"               4 minutes ago       Exited (0) 4 minutes ago                       vigilant_knuth
The docker ps command lists Docker containers.
The -a option includes stopped containers in the display candidacy.
-f ancestor=alpine:3.9 filters so only those with the image name alpine:3.9 are displayed.
You can combine -a and -f as -af.
Restart and Confirm Container ID Again
Restart the container once more.
# Generate and enter a Docker container
docker run -it alpine:3.9 /bin/ash
Exit immediately after entering.
# Exit the container
exit
Check the container ID again.
# Verify the created Docker container
docker ps -af ancestor=alpine:3.9
This time, it displays as follows:
CONTAINER ID        IMAGE               COMMAND                  CREATED             STATUS                     PORTS               NAMES
a4a95f438cbc        alpine:3.9          "/bin/ash"               12 seconds ago      Exited (0) 2 seconds ago                        serene_dubinsky
0cf65c560abb        alpine:3.9          "/bin/ash"               4 minutes ago       Exited (0) 4 minutes ago                       vigilant_knuth
Wait a minute, did it increase to two??
Yes, indeed. Every docker run generates a new container, like so:
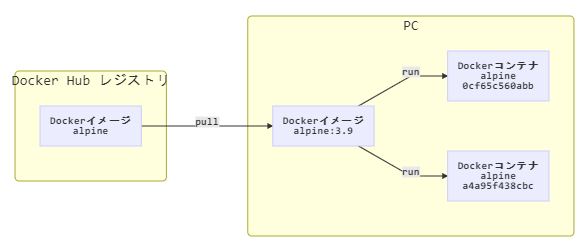
Previously, I explained a container is equivalent to a Linux machine.
Currently, this scenario means there are two Linux machines in existence.
Back when I first used the docker run command, I thought, "It's extravagant to create two Linux machines when one could suffice."
However, there's a philosophy in the Docker community: use a new container every time instead of reusing one!
Reusing a container can lead to cumulative issues like memory errors that degrade performance over time.
By preparing a fresh container each time, you can avoid such risks.
Deleting Created Containers
Now, let's delete the created containers.
Specify the container IDs to delete the containers like below.
# Delete Docker container
docker rm a4a95f438cbc
docker rm 0cf65c560abb

# Verify the created Docker container
docker ps -af ancestor=alpine:3.9
They are now gone and clean!
I Want to Use Node.js
Next, let's obtain a Docker image with Node.js.
Obtain and Start a Docker Image with Node.js
Pull the Docker image with Node.js that is publicly available.
# Download the Docker image with Node.js
docker pull node:12.3.1-alpine

# Generate and enter a Docker container
docker run -it node:12.3.1-alpine /bin/ash
Once inside, confirm if Node.js is installed.
# Check the Node.js version
node --version
v12.3.1
This time, Node.js is installed!
Exit the container.
# Exit the container
exit
I Want to Delete Docker Containers at Once
Earlier, containers were deleted by specifying IDs. However, manually checking container IDs every time is cumbersome.
Using the upcoming command can allow you to delete stopped containers all at once.
However, use with extreme caution.
If important data is stored in a stopped container, such as databases or logs, the data will be deleted along with the container.
Understand this and only proceed with this command if you wish to delete stopped containers in bulk.
# Delete stopped containers in bulk
docker container prune
If you're operating under the rule of "Don't reuse containers," the command above should generally not cause problems, but the cautionary note is included just in case.
I Want to Create Folders Within a Docker Container
Let's say you want to create a folder /src/app within the container.
I'll first introduce a bad method.
# Generate and enter a Docker container
docker run -it node:12.3.1-alpine /bin/ash
Once the container is generated, create the folder using the Linux command as follows.
# Create the /src folder
mkdir /src

# Create the /src/app folder
mkdir /src/app

# Exit
exit
When you close the container after creating a folder this way, will the same folder be there the next time you generate a container? Generate a Docker container again and check if the folder exists.
# Generate and enter a Docker container
docker run -it node:12.3.1-alpine /bin/ash
Once inside, check if the folder exists.
# Verify if the folder exists
ls -al /src/app
ls: /src/app: No such file or directory
An error occurred! The folder that was supposed to be there is missing!
As reiterated, a new container is generated each time you docker run, so the state of the previous container doesn't carry over.
Using a fresh container each time makes sense, but not being able to carry over the state is inconvenient.
I Want to Create a Docker Image with Folder Pre-created
In reality, using a feature called Dockerfile allows you to create a Docker image where a folder has already been created.
Create a Working Directory
First, create a directory to place the Dockerfile.
For now, let’s assume:
- Windows:
D:\Docker\DockerHandson - Mac:
~/Docker/DockerHandson
Feel free to choose any location you prefer.
This directory will henceforth be referred to as the working directory.
Writing a Dockerfile
Create a file named Dockerfile in the working directory. It has no file extension.
```dockerfile:Dockerfile
Node.js
FROM node:12.3.1-alpine
Create and move to the folder
WORKDIR /src/app
`FROM` specifies the base Docker image.

`WORKDIR` creates a folder within the Docker image and sets it as the current directory.

## Create a Docker Image

With the current directory set to the working directory, execute the following command.

```bash
# Create a Docker image based on the Dockerfile
docker build -t hoge:0.1.0 ./
This generates a Docker image named hoge:0.1.0.
docker build is the command used to generate a Docker image based on a Dockerfile.
-t hoge:0.1.0 assigns the name hoge:0.1.0 to the image being created.
The ./ at the end is the relative path to the directory where the Dockerfile is located.
This generates the image hoge:0.1.0.
Was it really created? Verify with the command below.
# Check for the image
docker images hoge
The output appears as follows:
REPOSITORY          TAG                 IMAGE ID            CREATED             SIZE
hoge                0.1.0               3e9a3b5598db        12 seconds ago      79.6MB
The Docker image has been created!
Enter the Docker Container
Generate and enter a container from the created hoge:0.1.0 image.
# Generate and enter a Docker container from the created image
docker run -it hoge:0.1.0 /bin/ash
Check if the folder exists.
# Verify if the folder exists
ls -al /src/app
The following should display:
total 8
drwxr-xr-x    2 root     root          4096 Nov 12 10:26 .
drwxr-xr-x    3 root     root          4096 Nov 12 10:26 ..
The folder is there this time!
In the future, creating a container based on this image should allow work with the folder already created.
Copy Host (Win/Mac) Files to Docker Image
Until now, we’ve created a Docker image with a folder pre-created.
Next, let's create a Docker image that copies files from the host (Windows/Mac) into that folder.
Create the 'app' Folder on the Host Side
Create an app folder directly under the working directory, and add an index.html file inside.
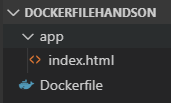
Here's the content for index.html.
```html:index.html
## Improve the Dockerfile

Rewrite the `Dockerfile` directly under the working directory as follows.

```dockerfile:Dockerfile
# Node.js
FROM node:12.3.1-alpine

# Create and move to the folder
WORKDIR /src/app

# Copy necessary files
COPY ./app /src/app
The COPY command appears here. It means copying the contents of the ./app folder on the host (Windows/Mac) side into /src/app on the Docker image side.
Let's create a Docker image based on this Dockerfile. The tag is updated to 0.2.0.
# Create a Docker image based on the Dockerfile
docker build -t hoge:0.2.0 ./
This creates a Docker image named hoge:0.2.0.
Check the Docker Container
As usual, generate a Docker container.
# Generate and enter a Docker container from the created image
docker run -it hoge:0.2.0 /bin/ash
Check if index.html exists inside the Docker container!
# Verify if the file exists
cat /src/app/index.html
The HTML content should be displayed!
Can't I View the HTML Inside the Docker Container from the Host's Browser?
Now that we've placed the HTML file, let’s explore viewing the HTML file using the host's browser.
Follow these steps to accomplish this:
- Open ports
- Install Express
Introducing Express would make this explanation lengthy, so it's omitted here. Apologies for any inconvenience.
In Conclusion
How was your experience handling Dockerfile?
By actually performing these tasks, you might have gotten a feel for Docker.
Finally, let's delete the unused containers!
# Bulk-delete unused containers
docker container prune
Thank you for your efforts.
This was an article for the second day of the Docker Advent Calendar 2019. Tomorrow's article by @ProjectEuropa will be on quickly managing PHP, Ruby, and Node.js within the same container using multistage builds.