PlayMaker Workshop Session 1: Avoid Many-to-Many Connections
This article is a translated version of my original post on Qiita. Original (Japanese): https://qiita.com/segur/items/24f4f564fd9729b086e7
PlayMaker Workshop Session 1: Avoid Many-to-Many Connections
We are hosting a PlayMaker workshop for our in-house STYLY Scene Creators! I'm sharing the materials here as well.
This is a series, so feel free to read only the parts that interest you!
PlayMaker Workshop Series
- PlayMaker Workshop Session 1: Avoid Many-to-Many Connections ← Current article
- PlayMaker Workshop Session 2: Handling Large Files with Arrays
- PlayMaker Workshop Session 3: Manipulating Materials at Runtime
Target Audience
This article is intended for:
- Individuals who have experience creating or developing something with Unity's PlayMaker.
- Those who are not very confident in designing with PlayMaker.
When You Realize Your FSM is a Mess of Transitions
Have you ever seen a PlayMaker FSM like this?
A vast number of states are connected by a vast number of transitions (wires) crisscrossing everywhere!
Although it seems to have some regularity and can be deciphered with effort, it's extremely complex!
If you've inherited this from a senior member, you might curse them while vowing, "I'll never create an FSM like this!"
Despite such promises, you might find yourself drawing numerous transitions before you know it.
Why does this happen in the first place? Let's explore this with an example!
Example Scenario
Suppose you need to design a PlayMaker FSM that fulfills the following requirements:
- There are 3 buttons.
- There are 3 exhibits.
- Clicking
Button 1displaysExhibit 1while hiding the others. - Clicking
Button 2displaysExhibit 2while hiding the others. - Clicking
Button 3displaysExhibit 3while hiding the others. - A reveal effect plays when an exhibit is displayed.
- A disappearance effect plays when an exhibit is hidden.
- Clicking the same button repeatedly does not display the reveal effect.
Think of it like changing channels with a TV remote. This is a common scene!
Plan A: Many-to-Many Connection (Anti-Pattern)
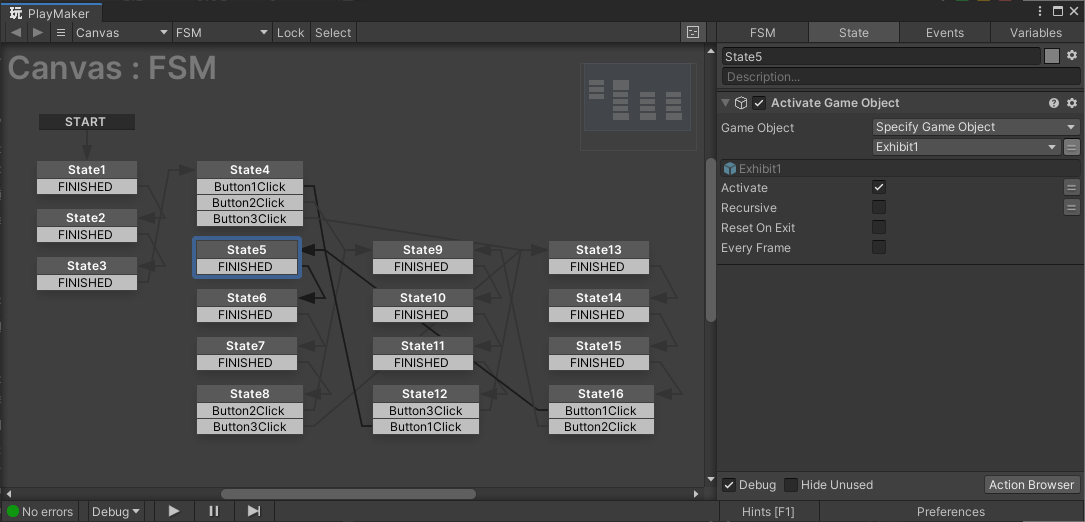
Attempting to fulfill the example requirements, I created a PlayMaker FSM! (The following is an anti-pattern, so don't replicate this!)
To prevent the reveal effect when the same button is clicked continuously, transitions are set to occur only when a different button is clicked!
I've added detailed comments, so there should be no complaints!!
Well, there are plenty of complaints!
Frankly, it's a mess and incomprehensible!
Why did it become so complex? The main cause is the use of many-to-many connections!
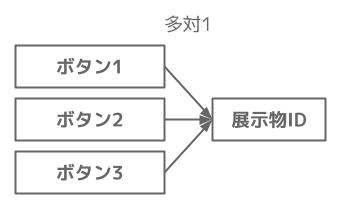
A many-to-many connection looks like this:
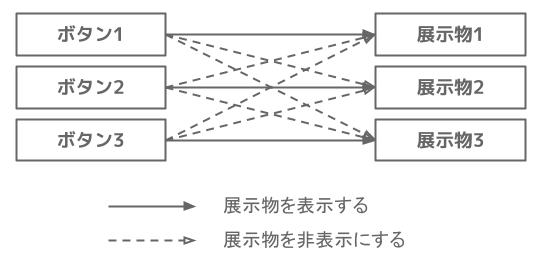
Here, there are 9 arrows.
3 \times 3 = 9 arrows
If the specification changes and the number of exhibits increases to 4, you’ll have 16 arrows! With 5 exhibits, you’d have 25 arrows!
The more arrows, the more work for the PlayMaker creator.
In other words, the workload increases quadratically!
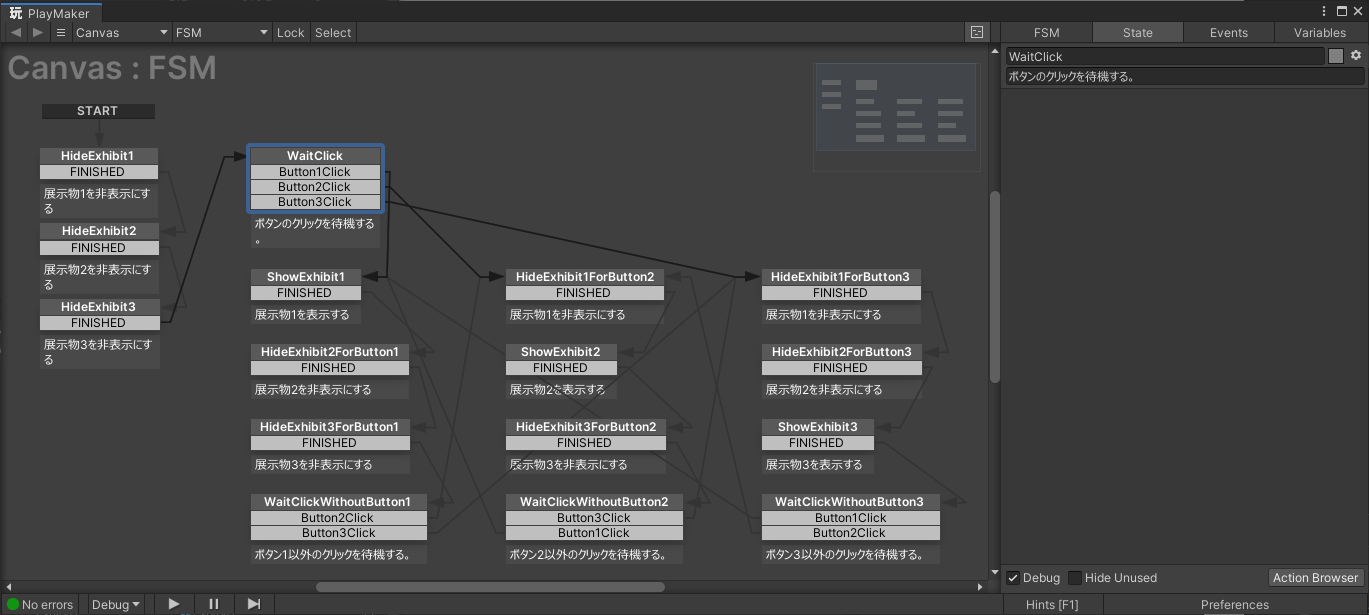
Plan B: Combining Many-to-One and One-to-Many Connections
Instead of many-to-many connections, use a combination of many-to-one and one-to-many connections! Aim for a setup like this:

In this case, there are 6 arrows.
3 + 3 = 6 arrows
Even if the number of exhibits increases to 4, you still only have 8 arrows! With 5 exhibits, you have 10 arrows!
Thus, the workload increases linearly.
Plan B is n/2 times more efficient than Plan A!
If the number of exhibits is n, then:
- The workload for Plan A is
n×n. - The workload for Plan B is
n×2.
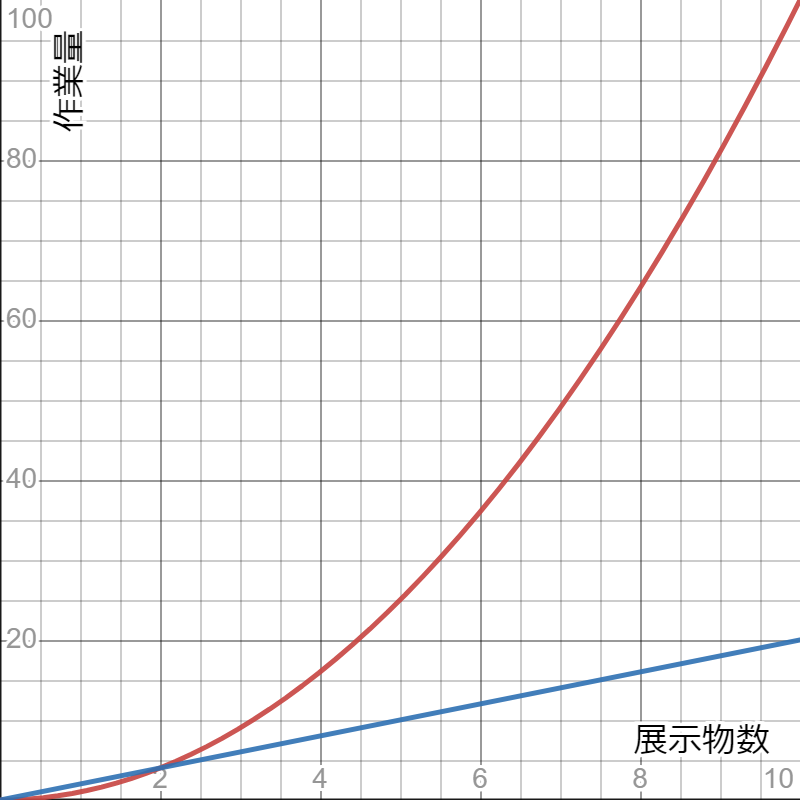
| Number of Exhibits | 1 | 2 | 3 | 4 | 5 | 6 | 7 | 8 |
|---|---|---|---|---|---|---|---|---|
| Plan A Workload (Many-to-Many Connection) | 1 | 4 | 9 | 16 | 25 | 36 | 49 | 64 |
| Plan B Workload (Many-to-One and One-to-Many Connections) | 2 | 4 | 6 | 8 | 10 | 12 | 14 | 16 |
Here's a graph showing the difference! The red line is Plan A, and the blue line is Plan B.
 |
|---|
| Graph created with: desmos |
As the number of exhibits grows, the workload gap becomes more pronounced!
As projects progress, the number of exhibits tends to increase but rarely decreases.
Stop designing with many-to-many connections immediately!
Implementing Plan B in PlayMaker
Now, you might wonder how to implement Plan B. Let's break this down into two steps: many-to-one connections and one-to-many connections!
Step 1: Many-to-One Connections
Many-to-one connections refer to this part:
First, create an empty GameObject named ExhibitManager. Add an empty FSM to it and create a variable named ExhibitId.
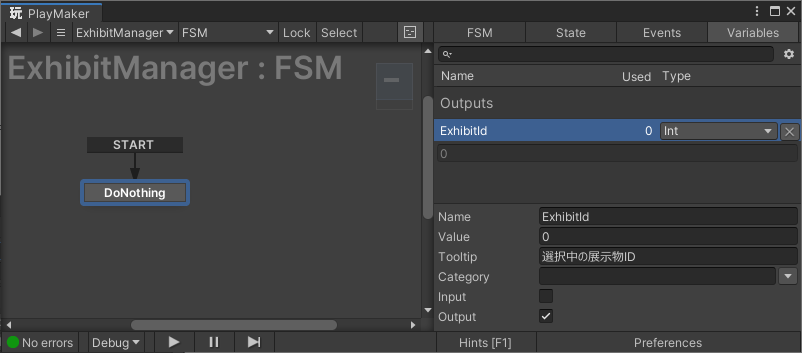
Exhibit is the English word for 展示物.
ExhibitId stores the ID of the currently selected exhibit!
Next, create an FSM for each button and add logic to update the ExhibitId when clicked. Specifically, use the SetFsmInt action to update the ExhibitId on the ExhibitManager.
Here's how it looks:
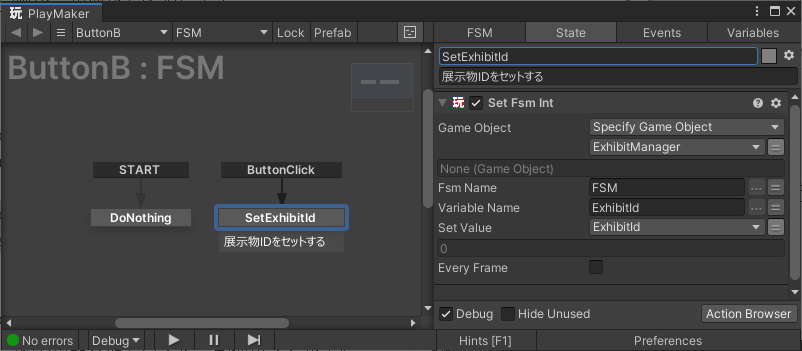
With this, the many-to-one connection setup is complete!
Step 2: One-to-Many Connections
Next, consider the one-to-many connection part:
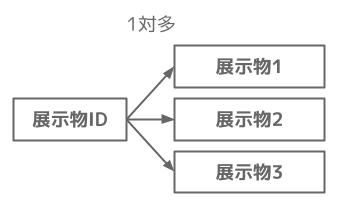
Create an FSM for each exhibit to monitor changes to the ExhibitId of the ExhibitManager.
Here's the setup:
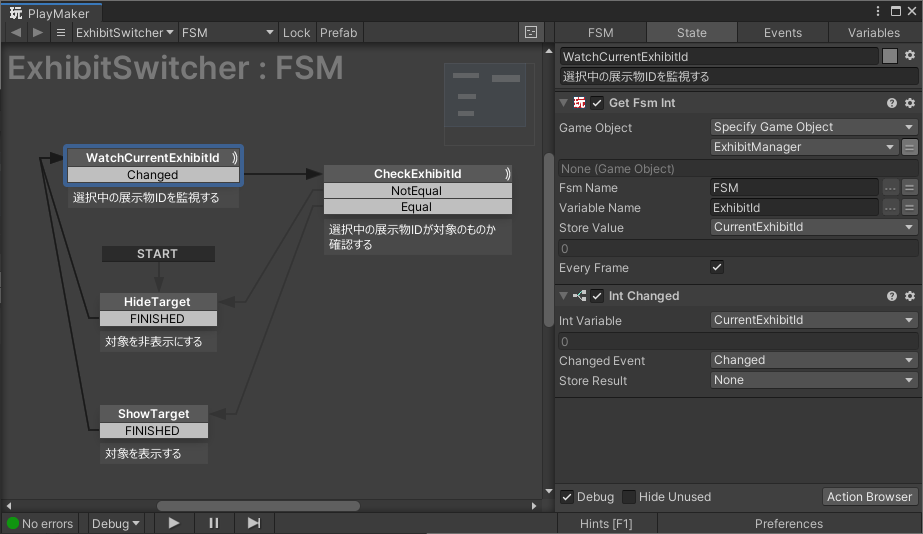
First, use GetFsmInt to get the ExhibitId from ExhibitManager.
By checking EveryFrame, it retrieves the value every frame.
When a change in the retrieved value occurs, the IntChanged action detects it and fires a Changed Event!
Now, processing only occurs when the exhibit ID changes!
When the same button is clicked repeatedly, the exhibit ID doesn’t change, so no processing occurs! Thus, there's no worry about the reveal effect displaying repeatedly.
Is the Computational Load Problematic?
With EveryFrame checked, does the computational load increase significantly?
To conclude, while computational load does increase slightly, it is negligible.
It merely retrieves and compares values, which can't be considered heavy processing.
The downsides of many-to-many connections outweigh this!
Conclusion
That's it for now! Thank you for your hard work!
Next is the Array session! I hope you'll continue to practice with us!
https://qiita.com/segur/items/10387b874cb4e28667af
This article was informed by the following resources. Thank you for the clear explanation!