Unity Scene Size Reduction Workshop Part 3: Model Edition
This article is a translated version of my original post on Qiita. Original (Japanese): https://qiita.com/segur/items/550af881e7e8d5470b92
Unity Scene Size Reduction Workshop Part 3: Model Edition
Reducing the size of a Unity scene is crucial for achieving smooth performance on low-spec devices. In most Unity projects, models tend to be the largest element after textures, so it's important to actively reduce their size!
This article serves as the notes for part three of a workshop series on scene size reduction, but it's not necessary to have read the previous articles. Feel free to explore them if you're interested!
Unity Scene Size Reduction Workshop Series
- Workshop Part 1: Sorting by Size
- Workshop Part 2: Texture Edition
- Unity Scene Size Reduction Workshop Part 3: Model Edition ← This article
- Workshop Part 4: Animation Edition
Let's Explore Project Settings!
First, let's take a look at Vertex Compression in the Project Settings.
Vertex Compression

You can find Vertex Compression under Project Settings > Player > Other Settings > Optimization.
This setting affects all meshes in the project by compressing vertex information. (Note that this is used only during the build process and does not affect the original mesh files.)
The number of vertices will not decrease! However, the precision of the data each vertex holds (e.g., decimal places of coordinates) will be reduced.
There are several options available, and for any checked item, the data size is reduced by half, although precision decreases accordingly.
| Option | Default | Description |
|---|---|---|
None |
🔲 | No compression. |
Everything |
🔲 | Compresses all of the following. |
Position |
🔲 | Position. Compression might significantly affect appearance. |
Normal |
✅ | Normals |
Tangent |
✅ | Tangents |
Color |
🔲 | Vertex color (not texture color) |
Tex Coord 0 |
✅ | Main UV, commonly used for color textures and normal maps. |
Tex Coord 1 |
🔲 | Secondary UV, often used for lightmaps. |
Tex Coord 2 |
✅ | Additional UV |
Tex Coord 3 |
✅ | Additional UV |
For checked items, the precision changes from FP32 to FP16. While this reduces the data size by half, it also slightly lowers precision, resulting in a trade-off between appearance and performance.
Differences Between FP32 and FP16
Both FP32 and FP16 are data formats used by computers to represent real numbers (floating point numbers). Here are their differences:
| Data Format | Size | Representable Range |
|---|---|---|
| FP32 | 32bit | 1.4 x 10^{-45} ~ 3.4 x 10^{38} |
| FP16 | 16bit | 5.96 x 10^{-8} ~ 65504 |
Vertex Compression Ineffective for Skinned Meshes
Note that Vertex Compression does not apply to skinned meshes. Skinned meshes are those that deform when bones are moved, like avatars.
Review Model Settings!
Next, let's examine the settings for each model! Selecting a model file like an FBX will display settings in the Inspector window.
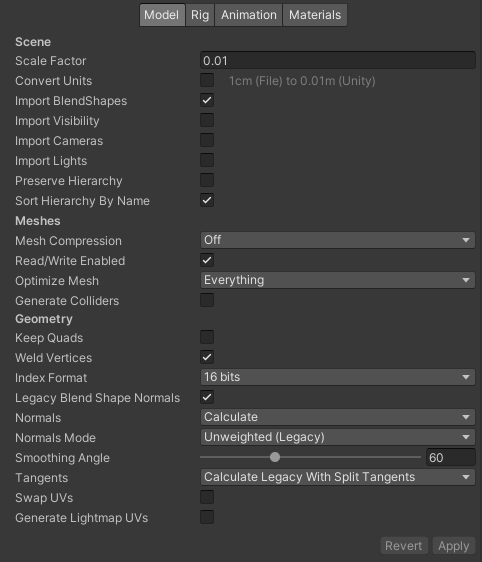
These settings are used during the build process and do not affect the original model files, so feel free to tweak them to explore different outcomes!
Below are settings that can effectively reduce size:
Import BlendShapes
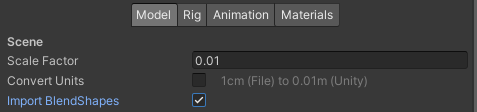
Import BlendShapes decides whether or not to import blend shapes.
For models not utilizing blend shapes, set this to OFF to reduce size!
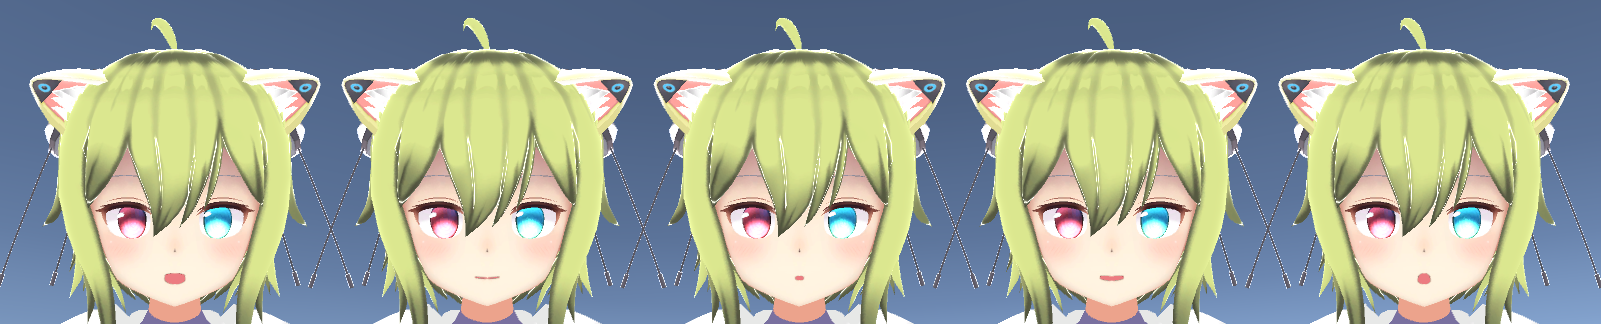
What Are BlendShapes?
Blend shapes are a technique for animating a mesh by moving its vertices, often used for controlling facial expressions and mouth movements.
The image below shows a mouth changing shape using blend shapes applied from left to right as a, i, u, e, o.
Mesh Compression
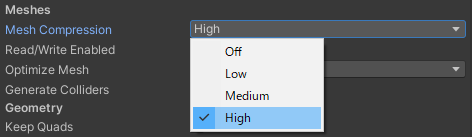
Mesh Compression allows you to set the compression level for each mesh.
Mesh Compression overrides the project-wide Vertex Compression setting, prioritizing mesh-specific settings.
Here are the options:
| Value | Size | Quality | Position Compression | Normal Compression | Tangent Compression | UV Compression | Color Compression |
|---|---|---|---|---|---|---|---|
Off |
Max | Best | 1.0 | 1.0 | 1.0 | 1.0 | 1.0 |
Low |
Large | High | 1.6 | 4.6 | 4.4 | 2.0 | 1.0 |
Medium |
Med | Med | 2.0 | 5.6 | 5.3 | 3.2 | 1.3 |
High |
Small | Low | 3.2 | 7.4 | 6.7 | 4.0 | 2.0 |
Even when using Mesh Compression, vertex count isn't reduced. Instead, the precision of data like positions and UVs per vertex is lowered.
None |
Medium |
High |
|---|---|---|
| No Compression | Size is about 40% of None |
Size is about 30% of None |
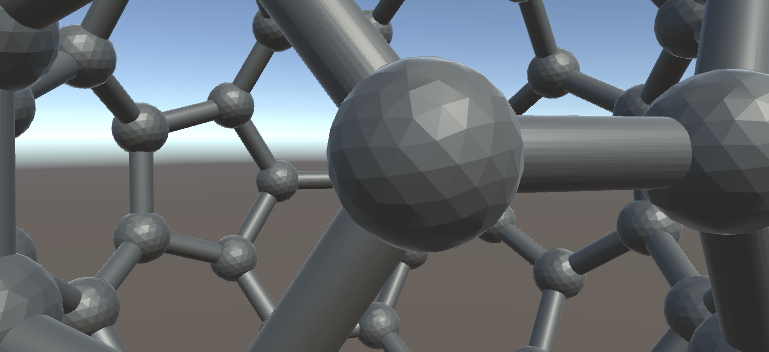 |
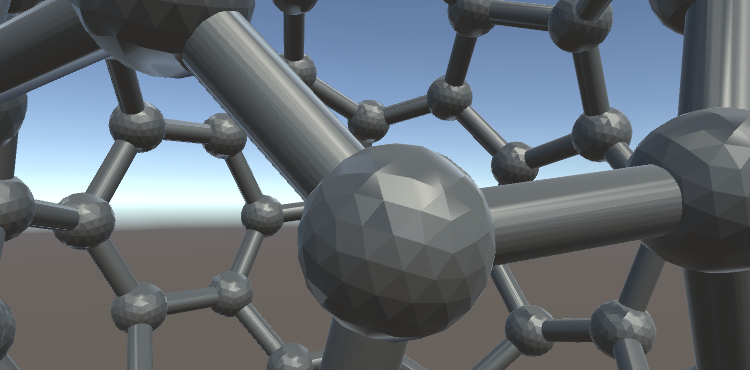 |
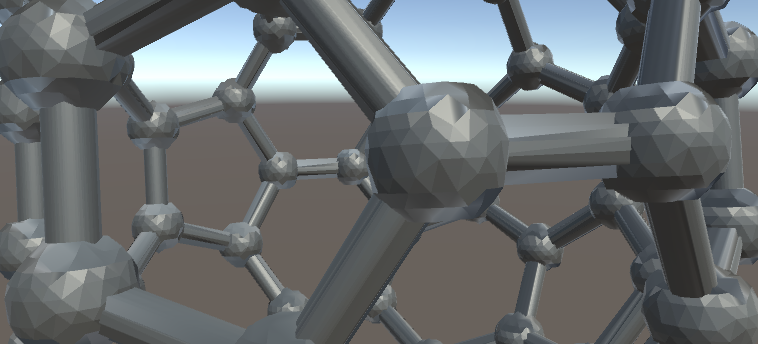 |
| Image from: Reducing build sizes in Unity3D |
As shown on the diagram, the higher you go in compression (High), the more you reduce size but also compromise quality, resulting in a trade-off between appearance and performance.
Legacy Blend Shape Normals
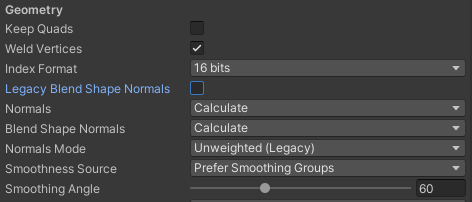
Legacy Blend Shape Normals relates to the normals calculation for blend shapes.
You have the following choices:
| Value | Normal Calculation Method |
|---|---|
ON |
Enables the older method. |
OFF |
Enables the newer method (Blend Shape Normals). |
As the name suggests, this is an option to enable the old method, and unless you have a specific reason, it's generally better to set it to OFF. Instead, configure Blend Shape Normals, which is explained next.
Blend Shape Normals

Blend Shape Normals pertains to the normals of blend shapes. You can set this if Legacy Blend Shape Normals is OFF.
Options include:
| Value | Size | Purpose |
|---|---|---|
Import |
Large | Uses normals for each blend shape as present in the model. Choose this if you want to use the normals created in a modeling software. |
Calculate |
Large | Unity automatically calculates normals for each blend shape based on Normals Mode, Smoothness Source, and Smoothing Angle. This is a more refined algorithm compared to Legacy Blend Shape Normals. |
None |
Small | Do not use normals for each blend shape and use common normals for all blend shapes. |
If blend shapes aren't used in your model, choose None to reduce size!
Even if you determine that using common normals for all blend shapes is acceptable, selecting None will also reduce size.
What Can Be Done Outside of Unity
So far, we have covered settings within Unity. However, these often provide broad adjustments with limitations. If you can use modeling tools like Blender, the following methods might further reduce size:
Remove Unnecessary Data
Assets sold in stores typically include numerous data types to accommodate various uses, such as:
- Meshes
- Normals
- Tangents
- UVs
- Vertex colors
- Bones
- Skin weights
- Blend shapes
It's often not necessary to include all this data in your Unity scene. By removing unnecessary data before importing into Unity, you can reduce size.
Reduce Vertex Count
While not yet discussed, reducing the vertex count is a highly effective way to reduce size.
Meshes with excess vertices should have their count reduced.
 |
|---|
| Image from: Blender3.1 Reduce Faces/Vertices: Decimate Modifier |
However, reducing vertex count riskily can alter appearance significantly, requiring careful consideration and advanced knowledge.
There are numerous tools and methods (both paid and free) available, and since it's beyond the scope here, this discussion is omitted. Many excellent articles are available online; please refer to those!
In Conclusion
That's all for this installment! Next time, we'll cover the animation section! Be sure to check it out!
https://qiita.com/segur/items/071e228258806f3e0113
This article was informed by the following resources. Thank you for the great explanations:
- Unity Documentation / Model Tab
- Unity Documentation / Mesh Data Compression
- Unity Documentation / Reducing File Size
- Summary of Methods to Reduce Unity App Build Size
- 20 Ways to Reduce the Size of Apps Created with Unity
- Capacity Reduction Know-How
- Solution to the Problem of Breaking Normals When Applying Blend Shapes to Custom Norm Meshes in Unity
- Practical Performance Analysis and Optimization in Unity
- Reducing Export Size of Model Data: Mesh Compression
- Blender3.1 Reduce Faces/Vertices: Decimate Modifier
- Reducing build sizes in Unity3D