Installing the Python FBX SDK on Windows
This article is a translated version of my original post on Qiita. Original (Japanese): https://qiita.com/segur/items/5d0dff790e784760a547
Installing the Python FBX SDK on Windows
I recently installed the Python version of the FBX SDK on my Windows machine.
I followed this article, which states that using the FBX SDK in Python is significantly easier than C++. However, I encountered a few issues during the installation process, so I am making a quick note to ensure I don’t forget these steps.
Here are the specifications I used:
- Windows 10 64-bit
- Python 2.7 (I'll explain why not Python 3.x later)
- FBX SDK 2019.5 (the latest version as of September 26, 2019)
I also installed it on a Mac, which I documented in a separate article: Installing the Python FBX SDK on Mac
Obtaining the Python FBX SDK Installer
Begin by visiting the Autodesk FBX Software Developer Kit site.
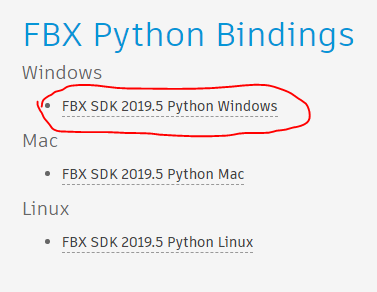
Scroll down a bit, and you’ll find a link labeled FBX SDK 2019.5 Python Windows. Clicking this link downloads the installer fbx20195_fbxpythonsdk_win.exe.
Run the installer and follow the instructions. If you keep the default installation folder, it will be:
C:\Program Files\Autodesk\FBX\FBX Python SDK\2019.5
However, simply installing it doesn’t mean you can start developing immediately.
Choose Python 2.7 Instead of 3.3
Upon opening C:\Program Files\Autodesk\FBX\FBX Python SDK\2019.5\lib, you'll notice there are versions for 2.7 and 3.3, each with a 32-bit and a 64-bit version.
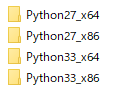
The 3.3 version only supports Python 3.3, not any of the later 3.x versions like Python 3.6. Since Python 3.3 installers are no longer distributed officially, I decided to use version 2.7.
Installing Python 2.7
If you have not yet installed Python 2.7, this would be the time to do so. I previously wrote an article detailing the steps, which you can refer to here:
Installing Python 2.7 and Python 3.7 on Windows
Following those instructions will install Python 2.7 at:
C:\Python27
Installing FBX SDK for Python 2.7
Depending on your OS architecture:
- For 64-bit OS:
C:\Program Files\Autodesk\FBX\FBX Python SDK\2019.5\lib\Python27_x64 - For 32-bit OS:
C:\Program Files\Autodesk\FBX\FBX Python SDK\2019.5\lib\Python27_x86
Navigate to the appropriate directory.
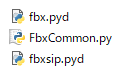
Copy the following three files directly to C:\Python27\Lib\site-packages:
fbx.pydFbxCommon.pyfbxsip.pyd
This completes the installation process.
If Using pipenv
If you’re using pipenv, note that the location of the site-packages folder will differ.
Run:
pipenv --venv
Check the Lib\site-packages folder within the path displayed.
Test Importing fbx
From your Python script, confirm that you can import fbx. Create a file named test.py and include the following code:
```python:test.py from fbx import *
Run this script using **Python 2.7**.

If the `py` command is available, execute like this:

```bash
py -2 test.py
If no errors occur during execution, the import was successful!
When ModuleNotFoundError Occurs
If you encounter the following error, you might be running the script with Python 3.x:
ModuleNotFoundError: No module named 'fbx'
This error message means the module named fbx could not be found. The installation process in this article does not cover Python 3.x, hence this error.
Ensure you are running with Python 2.7.
When ImportError Occurs
If you see this error, you may have mixed up x64 with x86 during installation:
ImportError: DLL load failed: %1 is not a valid Win32 application.
Make sure you've installed files from the correct directory:
- For 64-bit OS:
C:\Program Files\Autodesk\FBX\FBX Python SDK\2019.5\lib\Python27_x64 - For 32-bit OS:
C:\Program Files\Autodesk\FBX\FBX Python SDK\2019.5\lib\Python27_x86
In Conclusion
This article was informed by the following page. Thank you for the clear explanation!