GitHub Hands-On Part 1: For Individual Developers
This article is a translated version of my original post on Qiita. Original (Japanese): https://qiita.com/segur/items/601277fbbe8cfa08678b
GitHub Hands-On Part 1: For Individual Developers
I hosted a GitHub workshop for Unity creators at my company! Here's the material, made available for everyone to use.
This is a series, so feel free to read the parts that interest you!
GitHub Hands-On Series
- GitHub Hands-On Part 1: For Individual Developers ← This article
- GitHub Hands-On Part 2: Collaborative Development
- GitHub Hands-On Part 3: Branch Management
- GitHub Hands-On Part 4: Undoing Changes
- GitHub Hands-On Part 5: Ignore Lists
- GitHub Hands-On Part 6: Handling Large Files
Target Audience
This guide is for:
- Those who have been told to use GitHub by coworkers but have never tried it
- Those who wish to avoid command line interfaces
Occasionally, you'll see references to Unity, as our company uses GitHub to manage Unity project history. However, not knowing Unity won’t be a problem as the procedures here are straightforward.
Creating a GitHub Account
If you already have a GitHub account, skip this step.
For those without one, please create an account on GitHub.
Detailed instructions can be found here:
https://reffect.co.jp/html/create_github_account_first_time
The Free plan is sufficient.
Installing Fork on Your PC
Download and install Fork from https://git-fork.com/.
This is a GUI application for managing Git on your PC.
Why Git?
Why should you use Git?
To Safely Manage Edit History!
One of the primary reasons is the safe management of file edit history.
For example, managing history by duplicating files:
ImportantFile_20230324.txtImportantFile_20230324_2.txtImportantFile_2023-03-27.txtImportantFile_Final.txtImportantFile_Final_segur_revision.txt
Let's avoid managing history via file or folder names as it easily becomes confusing!
Instead, use dedicated software to manage edit histories!
Easily Revert Changes!
- Tried adding material but want to go back to the previous state.
- Installed Library A but want to revert to the pre-installation state.
Much like saving and loading in a game, reverting to a previous state makes tackling complex tasks more manageable!
Edit Safely with Multiple People!
When both Person A and Person B edit simultaneously, each edit history is recorded separately, so neither's work is wasted!
You can safely integrate work while resolving conflicts by comparing them!
Aspiring to make editing a safe, hassle-free process!
Git is No. 1 in Share
While there are other tools available, Git holds the largest share!
Creating a Personal Repository
What is a Repository?
A repository is the environment where edit histories are managed.
In English, repository means a storage place.
graph LR
    subgraph GitHub
        repository[Repository]
    end
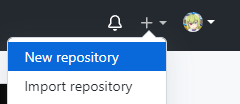
Creating a Repository on GitHub
Click on + > New repository in the top right of GitHub.
Naming the Repository
Enter a name for your repository.
For Unity projects, PascalCase is commonly used (although this may vary by industry).
Enter GitPractice for this exercise.

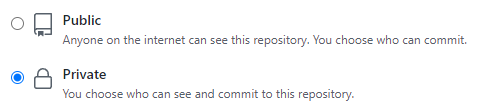
Choose the Visibility
Select Private.
If you select Public, it will be exposed to the world!
For handling internal company information, always select Private.
Click the Create Button
Click the Create Repository button!
If you see a page like the following, you've succeeded!

The string displayed in the text box (underlined in red) is the repository URL—make a note of it.
There are two types: HTTPS and SSH. We'll use SSH.
Cloning
What is Cloning?
Cloning is copying the server's repository to create one on your PC.
Names for clarity:
- The server's repository is called the remote repository
- The PC's repository is the local repository
graph LR
    subgraph GitHub
        remote[Remote Repository]
    end
    subgraph PC
        local[Local Repository]
    end
    remote -->|clone| local
Cloning with Fork
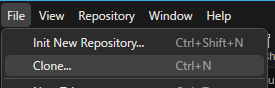
Click File > Clone at the top left.
Enter the repository URL you noted earlier in the Repository Url field.
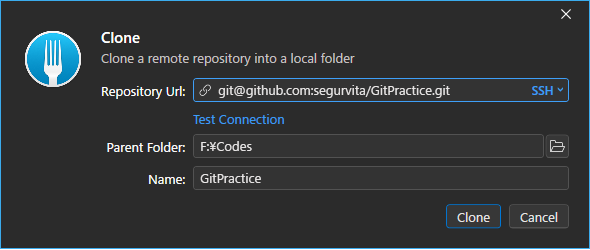
Parent Folder designates the directory on your PC for this work; select any folder you like. Ensure it doesn’t contain Japanese characters or spaces for safety.
Leave Name as its default (same as the repository).
Then press Clone.
SSH Connection Setup
Skip this step if cloning was successful.
If cloning failed, click here for help.
ssh -T git@github.com
ssh -T git@github.com
If not, click here for more help.
Committing
What is a Commit?
A commit denotes a unit of data logged in the edit history.
The action of logging into the edit history is also termed committing.
Create a README.md
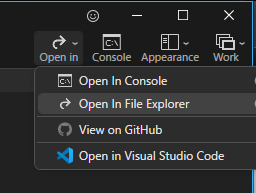
Select Open in > Open In File Explorer in the top right of Fork to access your working folder.
Create a file named README.md. .md indicates it's a Markdown file.

Open README.md in a text editor, input the following, and save it.
# GitHub Hands-On
Save in UTF-8 encoding or it'll appear garbled in Fork.
Add README.md to Stage
In Fork, click Local Changes and note that README.md appears under Unstaged.
Clicking README.md shows changes on the right.
If garbled, save README.md again using UTF-8 encoding.

Click Stage to move README.md from Unstaged to Staged.
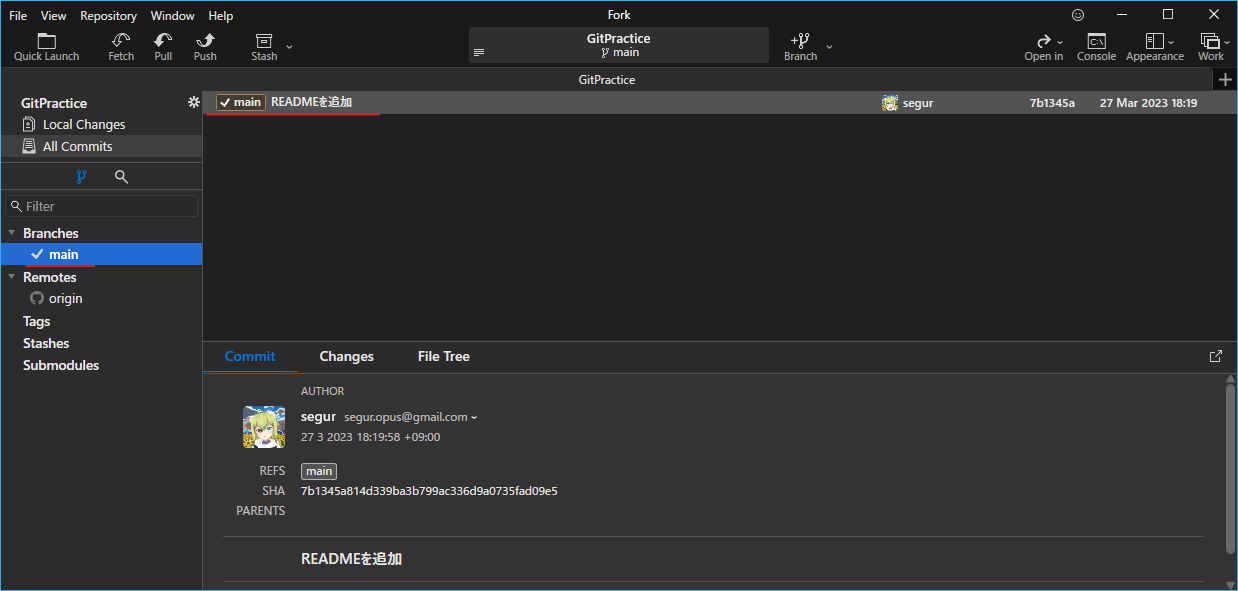
Commit README.md
In the lower right, enter Added README in the Commit Message field and click Commit File.
Click Branches > main on the left to see the Added README entry.
Edit README.md
Open README.md again in the text editor, update its content as follows, and save.
# GitHub Hands-On
This is a file for GitHub Hands-On.
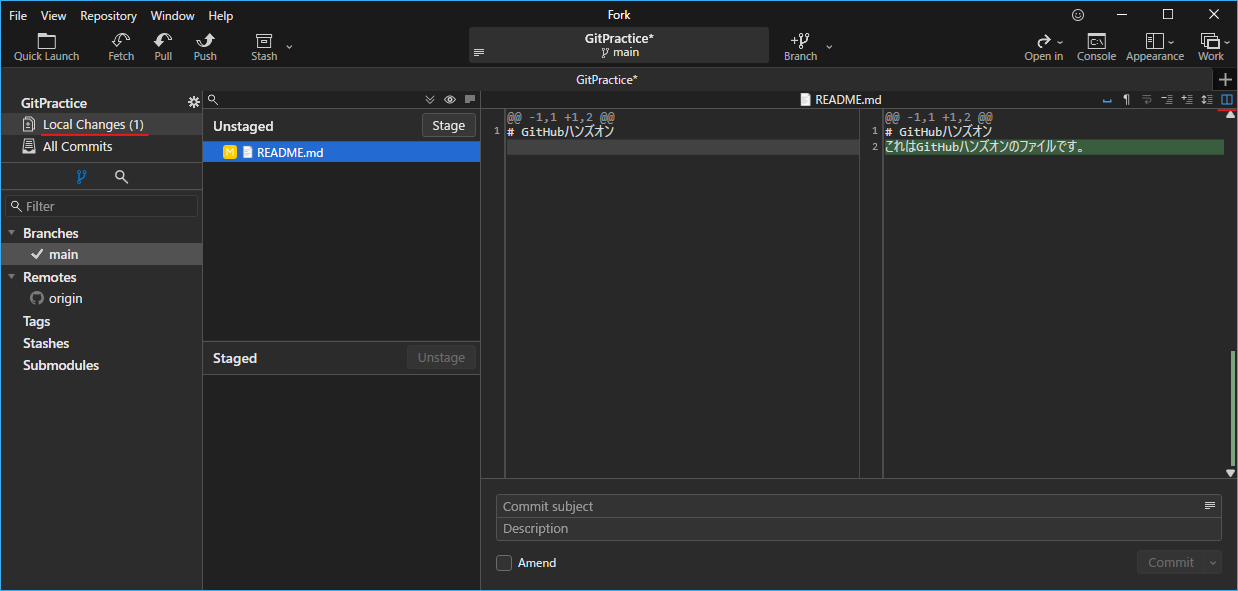
In Fork, check Local Changes to find README.md under Unstaged.
The differences from the previous commit are shown on the right.
If not displayed in a two-column view, click the icon at the top right.
Commit README.md Again
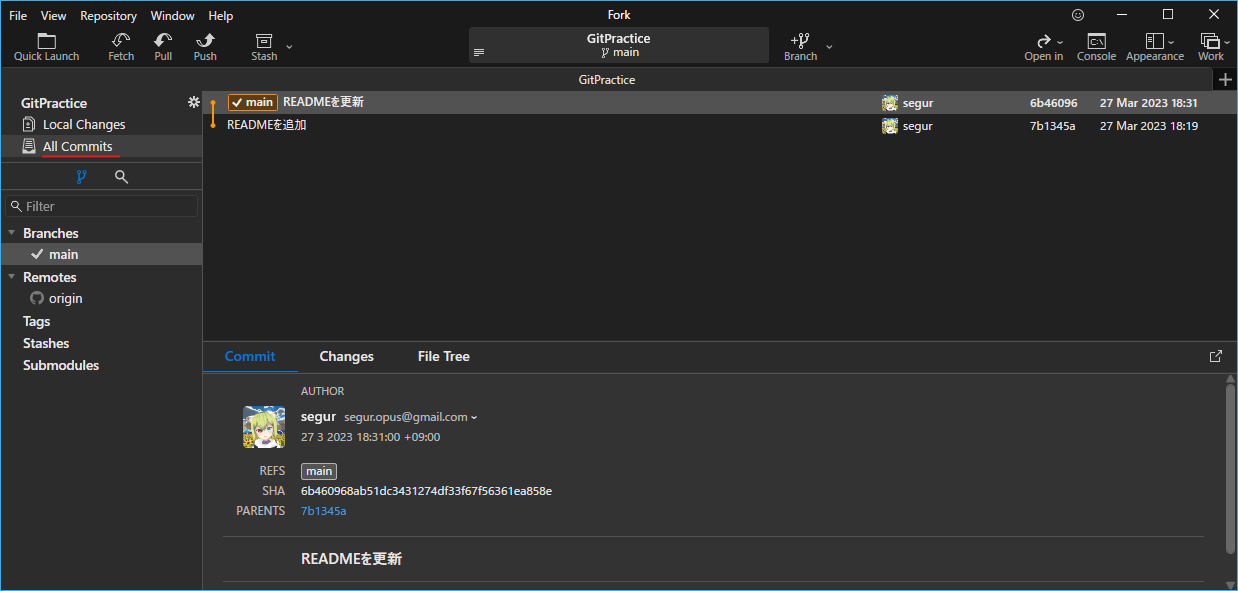
Like before, click Stage, then enter the commit message Updated README, and commit.
Now, click on All Commits on the left.
Verify that an Updated README entry has been added.
This illustrates how edit histories are managed in commit units!
What is Staging?
Staging is where file change data that is candidate for commits is stored.
graph LR
    subgraph Working Directory
        workingDirectory[README.md]
    end
    subgraph Local Repository
        subgraph Stage
            stage[README.md]
        end
        subgraph main branch
            main[README.md]
        end
    end

    workingDirectory -->|add| stage
    stage -->|commit| main
The main branch appeared suddenly, which will be explained next time!
Pushing
What is Pushing?
Pushing is copying the contents of the local repository to the remote repository.
graph LR
    subgraph PC
        subgraph Local Repository
            local[main branch]
        end
    end
    subgraph GitHub
        subgraph Remote Repository
            remote[main branch]
        end
    end

    local -->|push| remote
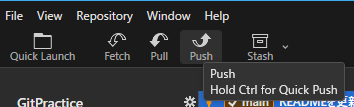
Push
In Fork, press the top-left Push button.
A dialog like this will appear!
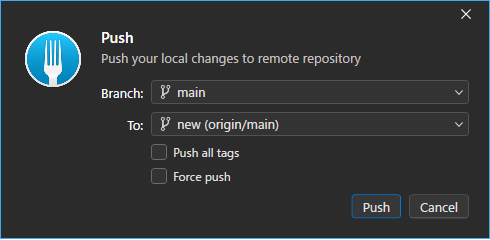
Press Push to start the push!
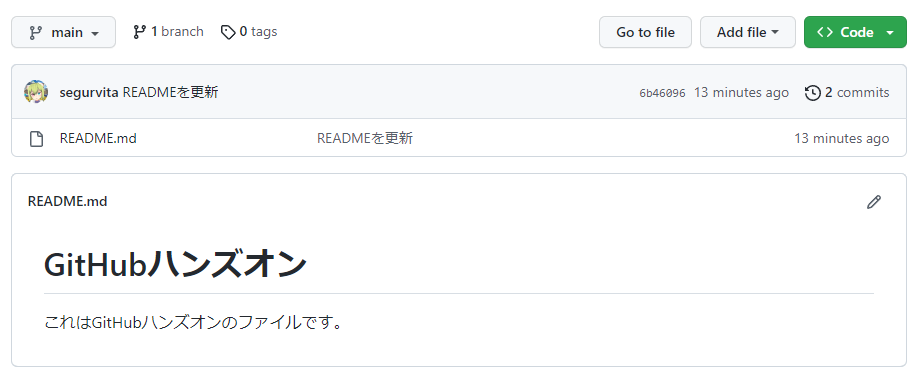
Check the GitHub Page
After pushing, reload your GitHub repository page.
If the contents of README.md are displayed like below, you've succeeded!
Conclusion
That's all for this session—well done!
Next session covers collaborative development! We hope you will continue to practice along!
https://qiita.com/segur/items/a3f7b9063829850391c5
This article was created referencing the following articles. Thank you for them!